Saturday, November 16, 2013

Fabric Christmas Ornaments: Tutorial

Supplies Needed:
Cardstock patterns - I cut some shapes with my Cricket machine but you could free hand it or use stencils. *The shapes with less details seemed to turn out better.
Fabric -  Pieces of fabric that fit your shapes, I folded my fabric pattern on the outside and traced and cut from the pattern.
Embroidery Floss - Any color you would like to use to accent your ornament.
Sewing Needle - A sewing needle that you can fit your floss into. I'm not sure what size it is.


Polyester Fill - For the stuffing I used this polyester fill I could easily put in. 
 
Buttons - Any size or shape or color of buttons you can add to your ornament.  I got a small tube of each of these at Michaels for a dollar.


Ribbon - Any kind of ribbon, I used 3/8 inch grosgrain and cut an 11 inch piece for each ornament. 

 
Sewing machine or you can hand stitch 
 
 
Directions:
 1. Trace and cut out your patterns onto your fabric. Fold the fabric with the pattern facing outside on both sides.  Trace cardstock pattern right onto fabric with a pencil. Cut out shapes.  You should have two pieces of fabric, one for the back and the front. 
 
2. Fold ribbon at the ends and place between the two pieces of fabric.
 
3. Sew a straight stitch making sure you have the ribbon inserted between the fabric to ensure it will not be coming out. 


4. Finish sewing a straight stitch around the outside about a 1/4 inch away from the edge of the fabric. *Don't forget to leave about 3/4 of an inch open, where you will be filling the ornament with the stuffing.


5. Add a button with a small piece of embroidery floss.  I tied a knot at the end of my thread, put that on the underside of my button before I placed it on my ornament to hide it. and then went through the button to the other side 2 or three times. I wrapped the remaining thread around the backside of the button between the button and the fabric.  I am sure there are other ways to end and fasten this on.  This is just what I did.  
(Back)
 
 
6. Fill your ornament with the amount of stuffing you desire.  


7. Take piece of your desired color of embroidery floss approx. 24 inches long to accent and close your ornament.  I went over my sewing machine straight stitch and did a pretty close stitch with my floss to ensure it would be closed up where it was open. 


Finished product!!


Happy Holidays!
 
Mikaila


Friday, October 18, 2013

GREAT TEACHER GIFT - ID Badge Lanyard

It wasn't until last year I realized what a great gift a lanyard would be for my kids teachers.  I used some stringing wire a lanyard hook and a large split ring with a silver bead and some crimp tubes with beads.  


1. Put lanyard hook over large split ring.  
2. Cut wire so there is enough length to pull over your head without having a clasp closure and string beads on. 
3. Slide ends of wire through split ring and fold wire over the split ring.  Make sure you have enough plain wire without beads on it that you can fold it over without having too much trouble hooking the wire on. 
Hold each end of the wire together and put on your silver bead that will cover your crimp bead closest to the beads side. 
4. Then slide on your crimp bead, fold over your wire so its on both sides of the split ring and put ends of wire into the crimp bead and crimp to fasten. 
5. Slide ends of wire into silver bead and cut off any excess wire as desired.  

Finished!! 

I used two strands of 18" of beads which I got pretty cheap, I purchased the wire and silver beads from the craft store and the split rings and hooks from Walmart.

Thursday, August 29, 2013

Menu Schedule and Food/Snack Ideas

 Going on Vacation?
Here is a fill in menu schedule that I was inspired to put together for a friend who is going on a week long trip.  Also my ideas of snacks, lunches and dinner that can easily be packed or made away from home.  My kids are more of picky eaters so I didn't have great dinner ideas.  But feel free to use how you want and add in your own ideas.  Sometimes you just need a suggestion to get your ideas going.

                         DAY 1        DAY 2         DAY 3         DAY 4        DAY 5       DAY 6          DAY 7 


BREAKFAST


SNACK


LUNCH


SNACK


DINNER 


SNACKS BREAKFAST LUNCH DINNER
FRUITS: STRAWBERRIES CEREAL BLT WRAPS PIZZA ROLLS-HAM/PEPPERONI/CHEESE
KIWI YOGURT/GRANOLA PBJ SANDWICH/WRAP TACO SALAD OUT OF DORITO BAG
BANANAS BAGELS TURKEY/HAM SANDWICH/WRAP SPAGHETTI/BREAD/VEGGIE
APPLES/W PEANUT BUTTER EGGS/HAM TURKEY/HAM AND VEGGIE KABOBS HAMBURGERS/HOTDOGS
APPLESAUCE WITH STRAW WAFFLES GRILLED CHEESE  BEAN/CHEESE BURRITOS
FRUIT POUCH BREAKFAST BURRITOS CHICKEN NUGGETS QUESADILLAS
FRUIT CUP SMOOTHIES SPAGHETTI OS CHICKEN PARMESAN
GRAPES  POTATO BITES HOT DOGS/HAMBURGERS CHICKEN ROLLS
ORANGES PEANUT BUTTER ON TOAST TUNA SANDWICH/WRAP CHEESE/TURKEY HOT SANDWICH
DRIED FRUIT: RAISINS/CRAISINS MINI PANCAKES/WAFFLES CORN DOGS CHICKEN PATTY SANDWICHES/SALAD
FRUIT LEATHER MUFFINS/JUICE/FRUIT MAC AND CHEESE
FRUIT SNACKS FRUIT PIZZA/EGGS SLOPPY JOES *You can also interchange lunch ideas with dinner. 
FRUIT BOX APPLE/CHEESE MINI PIES FISH STICKS
VEGGIES: CUCUMBER SLICES FRUIT KABOBS/TOAST/CEREAL SANDWICH KABOBS- BREAD, MEAT, CHEESE
CARROTS/DIP
HOMEMADE LUNCHABLES
CELERY/W PEANUT BUTTER


CHERRY TOMATOES
*You can use any sort of bread, rolls, tortillas, bagels, pitas etc.
OTHER: DRIED YOGURT PIECES


GRANOLA BARS


HEALTHY COOKIES


BEEF JERKY


POPCORN


CHOCOLATE MILK


GRAHAM CRACKERS


PRETZELS


STRING CHEESE


FROZEN GOGURTS


TRAIL MIX


CRACKERS


MARSHMELLOWS


JELLO/PUDDING CUPS


CEREAL


POPSICLES


SMORES CEREAL MIX


VANILLA WAFERS


PEANUTS


Wednesday, August 14, 2013

Giveaway Item!


Free giveaway for one item of your choice in my shop
Miks Jewelry Shop!!!
Please comment on what you'd like to win AND share my page on your facebook page https://www.facebook.com/MiksJewelryShop?hc_location=stream, it's that easy.

All entries must be entered by 11:59 pm 8/18/13 Winner will be announced 8/19/13 and notified item must be "purchased" Through Miks Jewelry Shop by 8/25/13.  Coupon code will be sent to winner via personal Message. https://www.etsy.com/shop/MiksJewelryShop?ref=si_shop

Our winner is T. Parsons!! Congratulations

Friday, April 26, 2013

Earring Giveaway!!

I will be a part of a giveaway from Violets Buds, go here to enter to win a pair of my brass/turquoise dangle earrings, now through May 5.
Or you can buy your own for $9.00 at Miks Jewelry Shop use shipping code freeship for Free Shipping!!

Monday, April 22, 2013

Simple Beaded Necklaces

Here are just a few of the necklaces that I have recently made with Sterling Silver finishes and beads.  

Dyed Howlite Turquoise/Glass Salmon Beads/Dyed Jade Blue Beads

Thursday, April 11, 2013

Layered Tablecloth

Layered Tablecloth

I wanted to get or make a table cloth for my jewelry table when I do boutiques.  I wasn't exactly wanting to measure and be precise so I just went for it.  I got 1 piece of pink fabric with silver swirls on it 1 1/2  yards of this, And also 2 yards of silver poly satin.  

I didn't cut any edges off, I serged all the way around both pieces of fabric.  Using the cutting blade on my serger to cut off the edges of what needed to be cut. 
 

 Then I started on the shorter ends of the fabric folded over my seam just enough so it would stay under the sewing foot and did a straight stitch on the short ends of both pieces of fabric first.  Following I did the same for each of the long sides of fabric.

This is how my edges and corners turned out.  

So I did two separate pieces to layer on top of each other.  It will be able to be adjusted as needed but this was the easiest type of tablecloth I could imagine.  
 Super simple and easy!!

Saturday, April 6, 2013

Leibster Award!!

I am so excited to have been nominated for a Leibster Award - I have been nominated two times before but didn't do anything about it, I was very intimidated to figure out what I was supposed to do. I apologize for dropping the ball on that before, but am now ready to face what I need to to figure this thing out!  So thanks Plush Pink Allure for this nomination.


The Rules:
1. Anwer the 11 questions the blogger who nominated you asked.
2. Give 11 random facts about yourself.
3. Nominate 11 bloggers who have less than 200 followers.
4. Create 11 questions for the nominees to answer. 

Questions from Plush Pink Allure: 

1. Where is your personal paradise? Nahele Road, Maui Hawaii, When I'm not there (which I've only visited once), I look at my picture!
2. When was the last time you were scared? I can't remember
3. Who do you think has the pipes-- Jennifer Hudson or Beyonce? Beyonce
4. Do you watch reality TV? If so, which is your can't miss show? Survivor
5. Did you used to have a MySpace? (Not judging, I had one too lol) Nope
6. Do you prefer real or acyrlic nails? For myself real, but I like the look of acrylic
7. Who would YOU cast as Anna and Christian in Fifty Shades of Grey? Didn't read it, don't know
8. What is your ideal way to relax? Sleeping or surfing the net
9. Love or money. Which would you choose? LOVE
10. Have you ever wanted to skydive? It's on my to do list, we'll see if it ever actually happens
11. How long have you known your best friend? 13 years, my hubby
 
11 Random Facts about Myself:
1. I and my 4 other siblings are all adopted from different places and families. 
2. I have lived in CA, TX, MI and UT. 
3. I love to run.
4. I eat chocolate first thing every morning I can!
5. I have run 2 full marathons, 26.2 miles. 
6. I grew up with Sheep. 
7. I love dill pickles. 
8. Mexican is my favorite food. 
9. I love feeling productive. 
10. I have naturally curly hair and have only grown to love it within the last few years. 
11. I started college in Rexburg, Idaho. 

My Nominees: CHECK THEM OUT!
1.  Heather at Belles Bazaar
2. Melanie at Keep It Simple and Fun
3. Tracy at Warratahs Handmade Items and Photography
4. Kara at The Padgett Family
5. Sarah at By The Porch Light
6. Jen at Our Happy Family
7. Roxanne at Always Dreaming
8. Kristen at 3 Monkeys Mommy
9. Chelsee at Southern Beauty Guide
10. The Ladies at Huckleberry Love
11. Stella Marie at Domestic Evolution

My Questions for you: 
1. Do you still live where you were born?
2. What is the thing you like to do the most?
3. What number of child are you?
4. What is your dream vacation?
5. Pets or no pets? 
6. Do you like your given name?
7. What is your favorite food?
8. Morning person or night owl?
9. Thing you've done most recently that you were most proud of?
10. Favorite color?
11. Describe your childhood in one word? 


Monday, March 25, 2013

Hoop Earrings Tutorial


 1. Gather your supplies and tools needed.  I used round nose pliers, flat pliers, 2- 2 inch silver copper wire, 14 sterling silver 5mm beads (7 for each hoop), my 7mm jade beads 16 each (8 for each hoop), 2 small open jump rings, 2 fish hook ear wires.

 2. You will take your round nose pliers and start at the open end of the hoop and you will curl to the outside one side. Make sure you don't have a big enough space for the jump ring to slip out once fastened. Just keep curling over your hoop.
 3. After you have done this thread your beads on as you like.  I alternated my jade and silver. You will then close the other end of the hoop as you did before. You will curl the end over with your round nose pliers. And it should look like this.


4. You will then take one jump ring and open it, place it through the hole in the bottom of the fish hook ear wire. 
 5. As you hold onto the hoop, slide the open jump ring through the two curled ends of the hoop and close the jump ring with your flat pliers.  Close it enough so your jump ring won't allow much movement for the curled ends to turn the ring. 

6. You will then be finished with your first hoop and can move onto the next. 

Here is your completed pair of hoops! 

Blue Jade and Sterling Silver Bead Hoops

$7.00 Blue Jade and Sterling Silver Bead Hoops. 
I have blue, green, yellow, orange, pink and purple
Get yours today! 

Wednesday, March 13, 2013

Pink!!

Look what I found...I have been looking for some bright pink stone beads to make some earrings and I finally found them.  I was able to order them through Etsy from a seller in China but they are awesome.  I am so happy! I love the shape, size and color.  For your own pair check out my etsy page here.  Love them!!


Tuesday, March 5, 2013

St. Patrick's Day Hair Clip: Post for a Special Friend!- Heather Bell

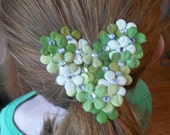
Heart shaped paper flower hair band 


These adorable hair clips are made by a best friend of mine, Heather Bell from BellesBazaar.  I met her in college over 10 years ago!  She is very fun and is always busy doing fun things with her 4 kids.  She has recently started making these super fun hair clips and headbands and I want to help spread the word.   
They range from $2.00- $8.00 with $2.00 shipping
What a great deal!! 
Here are just few other examples of what she has done.  Feel free to contact her for custom orders/colors, here is the link to her etsy shop KathrynAnnBoutique.


Check her out!

Thursday, February 21, 2013

Yellow Collection

 
Here is my latest favorite color to create with.  I am getting so excited for spring and what better color to use than Yellow! At first I wasn't so sure but after I saw the bright color, I loved it.  These necklaces are made from a golden agate nugget and a yellow jade stone.  
Enjoy!


Tuesday, February 5, 2013

Free Shipping Coupon Code

I just wanted to let you all know I have a coupon code for free shipping for 
my Jewelry shop - freeship. 
So come on over and check out what I have :)
 

Tuesday, January 22, 2013

Red Heart Earrings

Here is my small craft contribution to Valentine's Day!!

To make these small heart earrings I bought a string of heart beads at Michaels, used 4 silver beads, 2 headpins and 2 earwires. 
Who doesn't love the dark red for Valentine's day?
Miksjewelryshop.etsy.com
 

Monday, January 14, 2013

Dinner Decision Maker


I admit I am not a great cook and I am even worse at deciding what to have for dinner.  I have been inspired by a few different blog posts of a dinner calendar. Honestly that is to big of a commitment for me. After much contemplation on how I can become a better dinner maker I have decided all I needed help with is ideas of what to make for dinner.  I have plenty of cookbooks and recipes but I needed ones my family would eat.  So I went through the cookbooks and recipes I used the most. I used regular cardstock and cut them into strips all the same color.  I then wrote all main dishes I knew I would have stuff for on a regular basis, fairly simple dishes and ones we would eat, (at least my husband and I). I also wrote out names of green salads and jello salads for those Sunday dishes I could share with our extended family when needed. 

 I then put together this cute little box made out of three pieces of 4x6 cardstock paper so I could divide up my meals and salads and also a place where I could put "have made" dishes so I wouldn't be doing the same dishes over and over again. 
 This way I can pull out my main dish cards, hang them on my refrigerator and choose however many I want for the week and if needed buy ingredients for those meals and I can decide what to do when I want to.
  I know I will have the things I need to make what I have on my cards.  Because these are things I like to eat and make it will be easier to have all these ideas in one place, I hope this will make the idea process a little easier, now all I will have to do is to decide which meal I will choose, but the main thing is I have all my ideas that I know we will eat in one place.
 
Here is my little idea box nesting in the corner of my kitchen window.  I am really excited to try this out and see how long it lasts, I hope this is a keeper. :)